
一个域名关联两个网且都能支持SSL配置

自己有云服务器的环境下,使用 PHPStudy 8.1 配置 Apache + PHP + MySQL,设置 WordPress 网站时,如果希望一个域名【IP】关联两个网站且都能支持 SSL(HTTPS)安全解析,并且能够通过 HTTP 自动跳转到 HTTPS,步骤大致如下:
1. 配置 SSL 证书
首先,你需要为你的域名配置 SSL 证书。你可以选择使用免费的freessl 证书或者购买商业证书。假设你已经获得了 SSL 证书,你需要将证书和私钥文件放在服务器的合适位置。
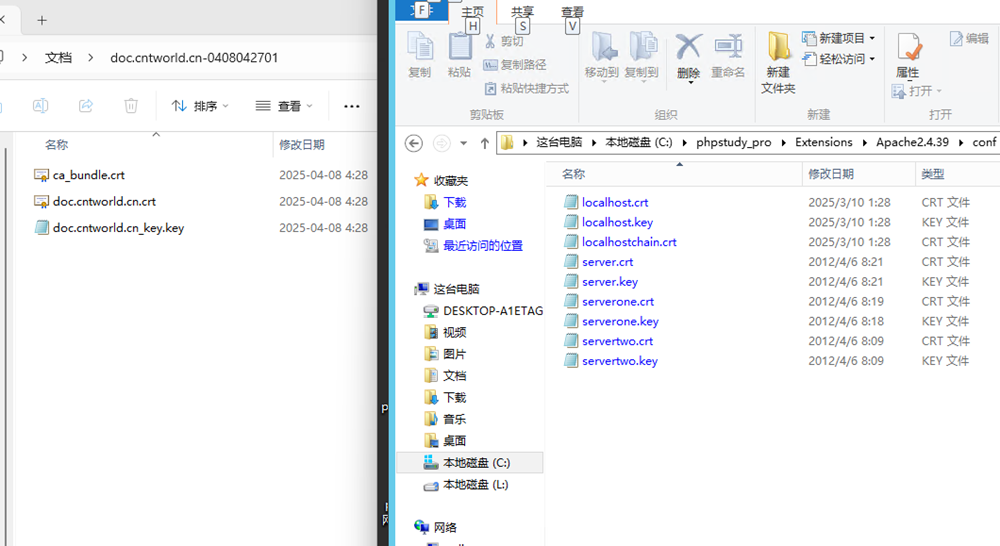
在 Apache 配置中,通常会需要以下文件:【本机实际ssl的路径,一些证书公钥、私钥都在此目录下c:\phpstudy_pro\Extensions\Apache2.4.39\conf\ssl目录下的文件】
localhost.crt:SSL 证书文件localhost.key:SSL 私钥文件localhostchain.crt:证书链(如果有的话)doc.cntworld.cn.crtdoc.cntworld.cn_key.key
因为每个网站有独立的域名(如 cntworld.cn 和 doc.cntworld.cn),则需要为每个域名申请一个单独的 SSL 证书。【cntworld.cn域名在腾讯云上dns解析,在服务器的phpstudy工具中对应的是localhost;doc.cntworld.cn在freessl上获取ssl授权在腾讯云上有dns解析,在服务器的phpstudy工具中对应的是doc.cntworld.cn】
- cntworld.cn 申请一个 SSL 证书。
- doc.cntworld.cn 申请一个 SSL 证书。
SSL证书申请的步骤:
打开freessl官网提示安装一个证书的管理工具CMLite工具;
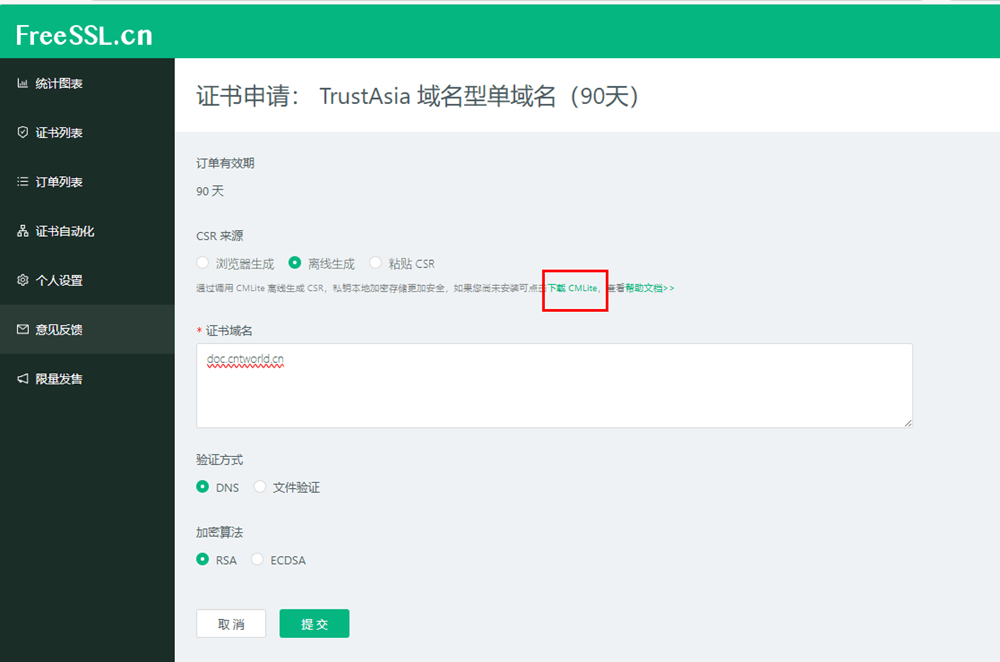
在证书管理工具中进行申请SSL证书,本例是能过在腾讯云服务器中DNS解析添加记录来实现的。
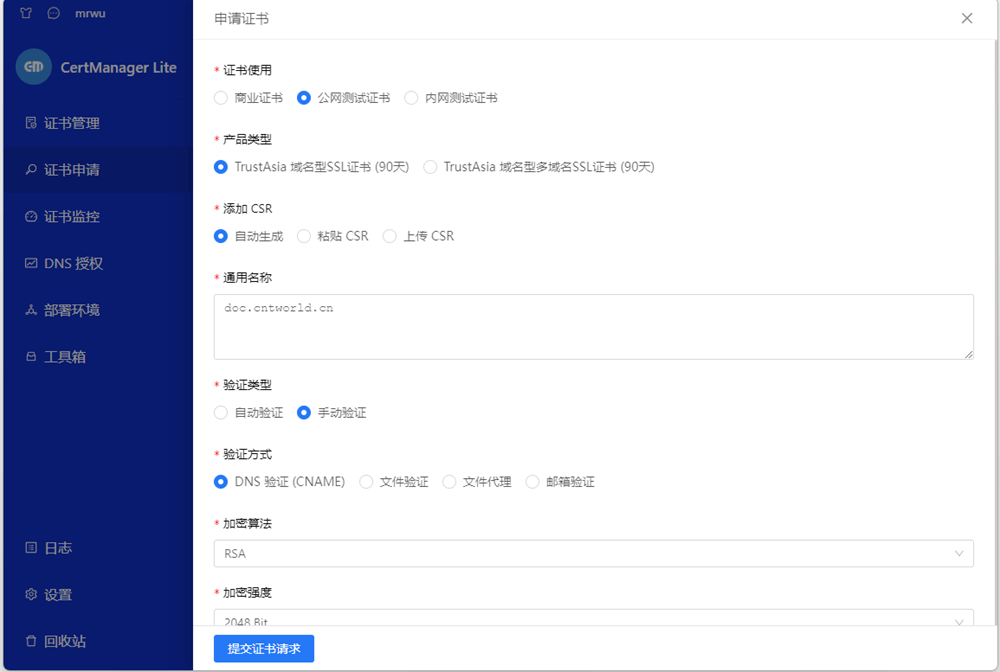
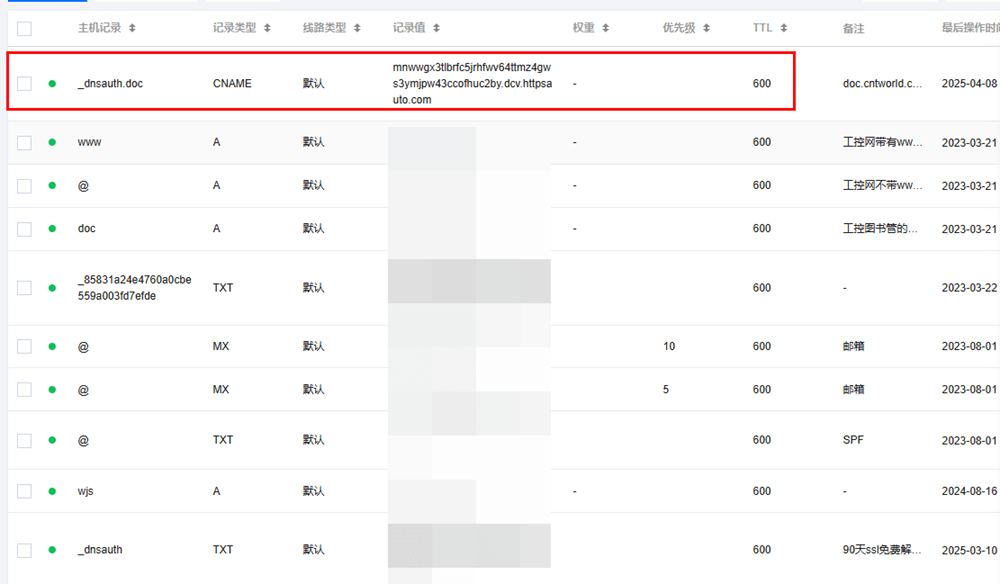
将书的信息如下图所示,添加到腾讯云服务器中

选中证书将其导出。
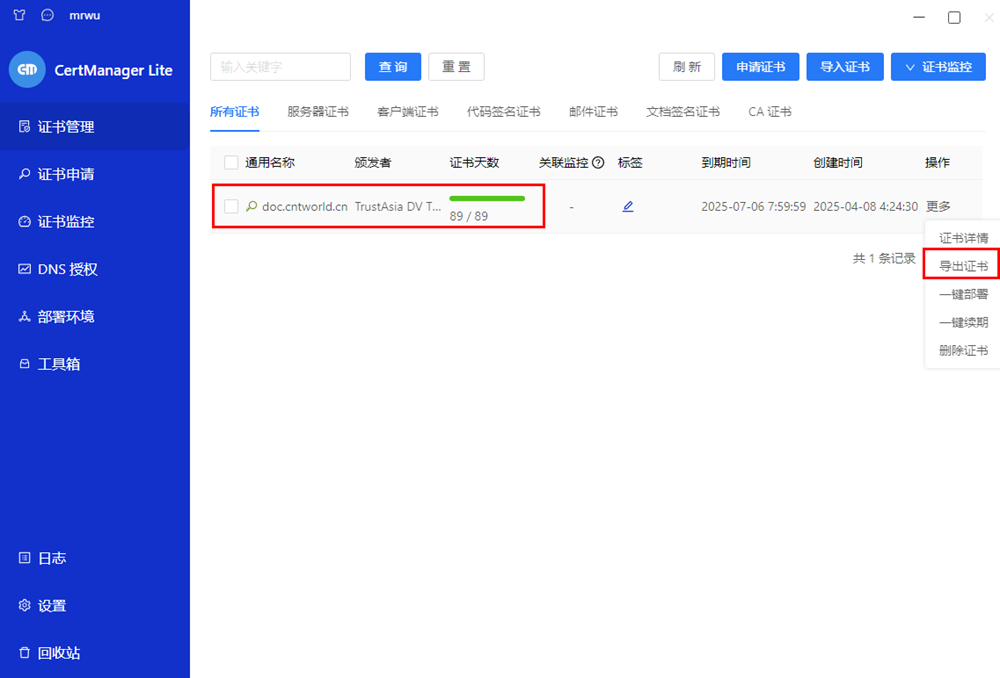
然后将这个证书的压缩包进行解压,放到服务器的证书路径下,本例路径:c:\phpstudy_pro\Extensions\Apache2.4.39\conf\ssl目录下。
2. 配置 Apache 虚拟主机
假设你要为两个不同的网站设置 SSL,确保你的 Apache 配置支持每个域名的 SSL 解析。
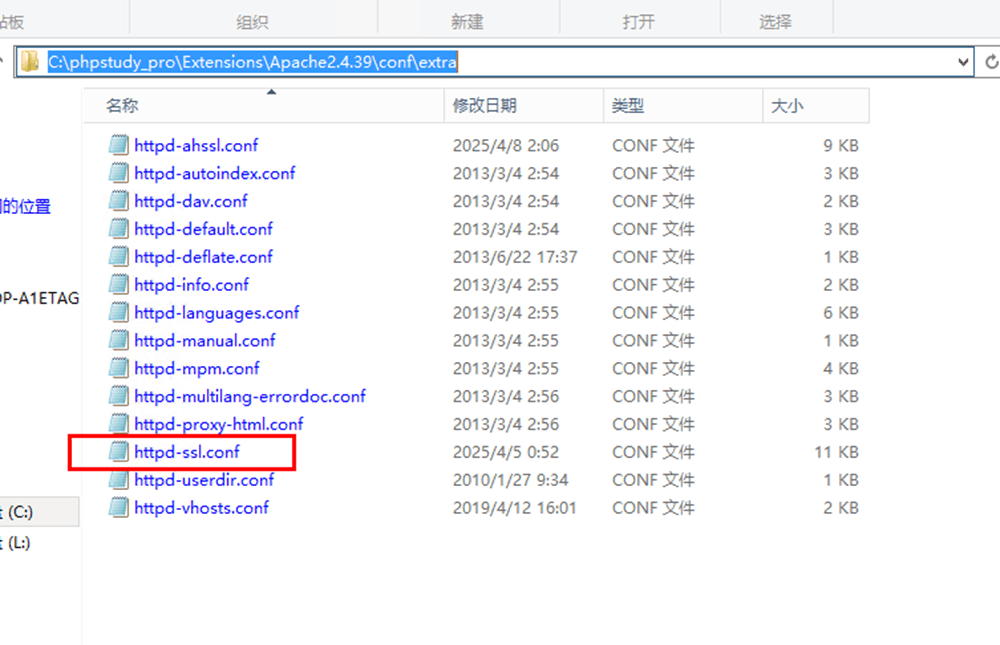
编辑 Apache 配置文件 (httpd.conf 或者 ssl.conf) 来为每个站点配置虚拟主机【本机是位于c:\phpstudy_pro\Extensions\Apache2.4.39\conf\extra\httpd-ssl.conf】。
#  第一个网站
<VirtualHost _default_:443>
DocumentRoot "C:/phpstudy_pro/WWW"
ServerName localhost:443

ServerAdmin admin@example.com
ErrorLog "${SRVROOT}/logs/error.log"
TransferLog "${SRVROOT}/logs/access.log"

SSLEngine on
SSLCipherSuite ALL:!ADH:!EXPORT56:RC4+RSA:+HIGH:+MEDIUM:+LOW:+SSLv2:+EXP:+eNULL
SSLCertificateFile "c:/phpstudy_pro/Extensions/Apache2.4.39/conf/ssl/localhost.crt"
SSLCertificateKeyFile "c:/phpstudy_pro/Extensions/Apache2.4.39/conf/ssl/localhost.key"

<FilesMatch "\.(cgi|shtml|phtml|php)$">
    SSLOptions +StdEnvVars
</FilesMatch>

<Directory "${SRVROOT}/cgi-bin">
    SSLOptions +StdEnvVars
</Directory>

BrowserMatch ".*MSIE.*" \
         nokeepalive ssl-unclean-shutdown \
         downgrade-1.0 force-response-1.0
CustomLog "${SRVROOT}/logs/ssl_request.log" \
          "%t %h %{SSL_PROTOCOL}x %{SSL_CIPHER}x \"%r\" %b"

    <Directory "C:/phpstudy_pro/WWW">
        Options Indexes FollowSymLinks
        AllowOverride All
        Require all granted
    </Directory>

</VirtualHost>

#  第二个网站
<VirtualHost _default_:443>
DocumentRoot "C:/phpstudy_pro/doc.cntworld.cn"
ServerName doc.cntworld.cn:443

ErrorLog "${SRVROOT}/logs/error.log"
TransferLog "${SRVROOT}/logs/access.log"

SSLEngine on
SSLCipherSuite ALL:!ADH:!EXPORT56:RC4+RSA:+HIGH:+MEDIUM:+LOW:+SSLv2:+EXP:+eNULL
SSLCertificateFile "c:/phpstudy_pro/Extensions/Apache2.4.39/conf/ssl/doc.cntworld.cn.crt"
SSLCertificateKeyFile "c:/phpstudy_pro/Extensions/Apache2.4.39/conf/ssl/doc.cntworld.cn_key.key"

<FilesMatch "\.(cgi|shtml|phtml|php)$">
    SSLOptions +StdEnvVars
</FilesMatch>

<Directory "${SRVROOT}/cgi-bin">
    SSLOptions +StdEnvVars
</Directory>

BrowserMatch ".*MSIE.*" \
         nokeepalive ssl-unclean-shutdown \
         downgrade-1.0 force-response-1.0
CustomLog "${SRVROOT}/logs/ssl_request.log" \
          "%t %h %{SSL_PROTOCOL}x %{SSL_CIPHER}x \"%r\" %b"
    <Directory "C:/phpstudy_pro/doc.cntworld.cn">
        Options Indexes FollowSymLinks
        AllowOverride All
        Require all granted
    </Directory>

</VirtualHost>
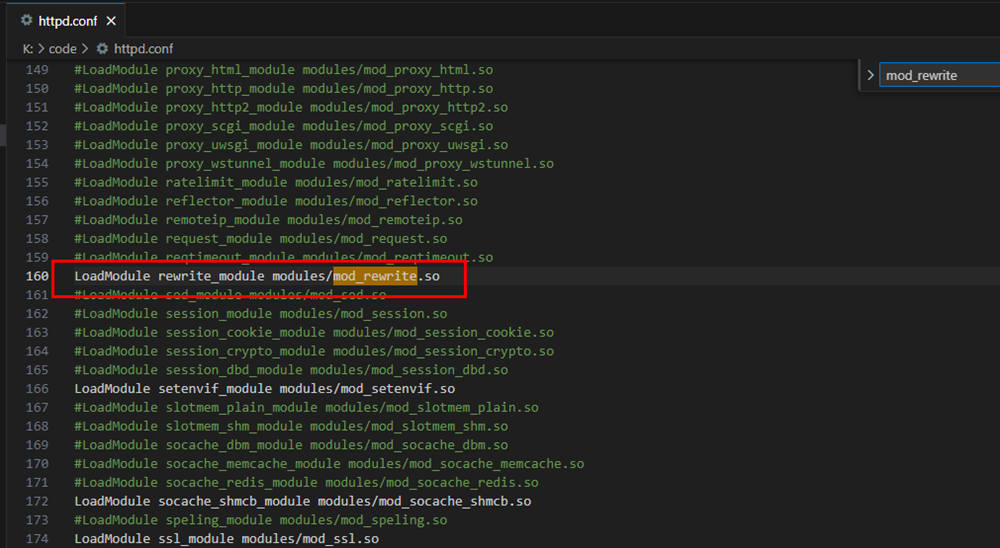
3. 启用 Apache 重写模块
确保 Apache 的 mod_rewrite 模块已经启用,这样可以正确处理 HTTP 到 HTTPS 的跳转。
在 c:\phpstudy_pro\Extensions\Apache2.4.39\httpd.conf 中确保以下行没有被注释掉:
LoadModule rewrite_module modules/mod_rewrite.so
4. 配置 WordPress 使用 HTTPS
对于每个 WordPress 网站,你需要确保 WordPress 正确配置为使用 HTTPS。
在 WordPress 的 wp-config.php 文件中添加或修改以下行:
define('WP_HOME', 'https://cntworld.cn');
define('WP_SITEURL', 'https://cntworld.cn');
对第二个网站进行类似配置:
define('WP_HOME', 'https://doc.cntworld.cn');
define('WP_SITEURL', 'https://doc.cntworld.cn');
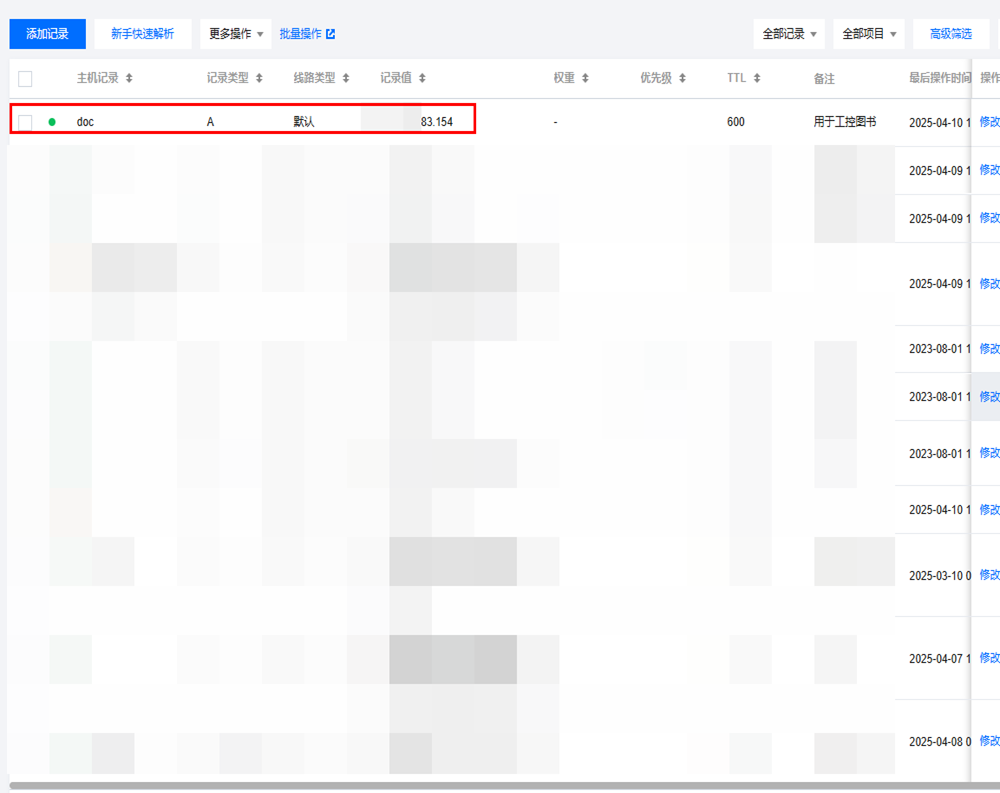
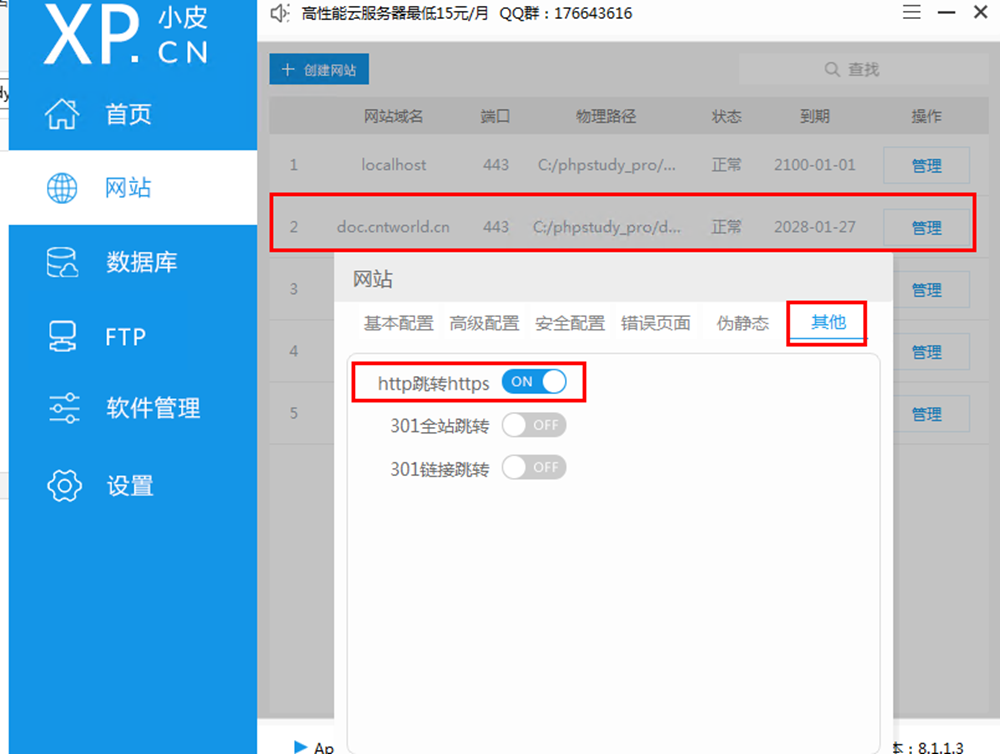
5. 在服务器中的phpstudy软件中对doc.cntwrold.cn进行http跳转到https,那么这个doc.cntworld.cn二级域名是哪来的呢,是在腾讯云服务器的顶级cntworld.cn的基础上创建的二级域名,要确保这个域名要一致,在Vitrulhost中的配置也要一致;
6. 确保数据库中的 URL 已更新
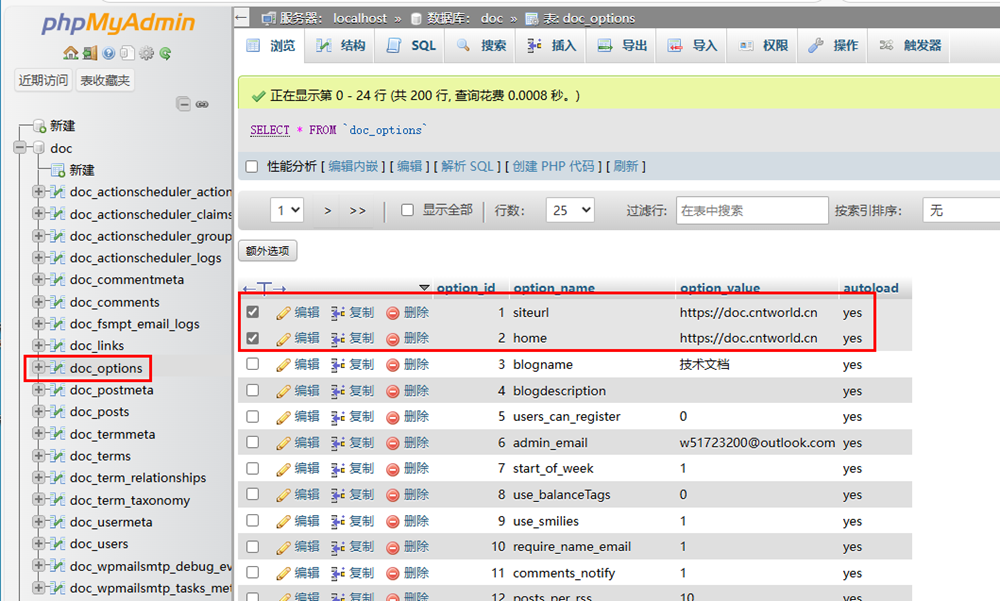
如果之前网站是通过 HTTP 访问的,你还需要更新 WordPress 数据库中的 URL,使其使用 HTTPS。【如果没有改默认的前缀是wp_xxx,本例是doc_xxxx】
通过进入数据库后台操作 SQL 语句:
UPDATE doc_options SET option_value = replace(option_value, 'http://doc.cntworld.cn:8080', 'doc.cntworld.cn') WHERE option_name = 'home' OR option_name = 'siteurl';
UPDATE doc_posts SET guid = replace(guid, 'http://doc.cntworld.cn:8080','https://doc.cntworld.cn');
UPDATE doc_posts SET post_content = replace(post_content, 'http://doc.cntworld.cn:8080', 'https://doc.cntworld.cn');
UPDATE doc_postmeta SET meta_value = replace(meta_value,'http://doc.cntworld.cn:8080','https://doc.cntworld.cn');
本例是手动修改的doc_options参数由原来的http://doc.cntworld.cn:8080改成了https://doc.cntworld.cn
7. 重启 Apache
修改配置后,重启 Apache 服务使更改生效。
# 重启 Apache
phpstudy restart
8. 测试
完成配置后,访问两个网站,确保以下情况:
- 访问
http://cntworld.cn和http://doc.cntworld.cn应该会自动重定向到https://cntworld.cn和https://doc.cntworld.cn。 - 确保 SSL 正常工作,浏览器没有显示安全警告。
如果一切配置正确,两个网站应该都能够在 HTTPS 环境下安全运行,并且 HTTP 会自动跳转到 HTTPS。


